This post may contain affiliate links. For more information, please see our affiliate policy.
Ready to take your summer grilling game to the next level? Learning How to Use a Charcoal Smoker is an adventurous next step, and it happens to be the key to amazing ribs, succulent brisket, and juicy chicken. If you’ve got a charcoal smoker in the garage, dust it off, and let’s get smoking!

Entire books have been written on the subject of BBQ, in excruciating detail, but if you’re new to BBQ, you’ve got a charcoal smoker, and you just want to dive in, consider this a guide to charcoal smoking for beginners.
A smoker grill cooks with indirect heat at lower temperatures over long periods of time, which is just what tougher cuts of meat need to taste fabulous. The collagen in the muscle fibers has a chance to break down and turn mouthwateringly tender during the course of the day.
When you add a little hardwood such as hickory, cherry, or alder wood to the firebox, you can introduce another layer of flavor and things only get more delicious.
This guide features the Weber Smokey Mountain Cooker. This moderately-priced vertical smoker has a large and devoted fan base and it’s easy to use. However, the principles carry over to other vertical charcoal smokers, too.
Table of Contents
- Charcoal smokers
- Smoker equipment and accessories
- What cuts of meat are best for smoking?
- How to light a charcoal smoker
- How to control charcoal smoker temperature, moderate heat, and get in the smoking zone
- How to add meat to the smoker
- The 3-2-1 Rule
- Common cooking times for charcoal smoking
- How to clean and maintain your smoker
- Types of hardwood
Charcoal smokers

There are many choices when choosing a charcoal smoker. Some high-end smokers have charcoal grills with smokers and can do double duty for both grilling and smoking. We feature the Weber Smokey Mountain Cooker (or WSM for short) in this post. It’s a great entry-level charcoal smoker at a moderate price and is available in a few different sizes depending on your needs:
- Weber 22-inch Smokey Mountain Charcoal Smoker ($498 on Amazon)
- Weber 18-inch Smokey Mountain Charcoal Smoker ($330 on Amazon)
- Weber 14.5-inch Smokey Mountain Charcoal Smoker ($220 on Amazon)
This smoker can also be used as a charcoal grill in a pinch. Just remove the cylindrical smoking chamber and cook in the lower section of the smoker. Most importantly, look for a smoker that has easy access to the food smoking chamber, and easy access to the coals, so you can add more if needed. Don’t rush into the process.
Smoker equipment and accessories
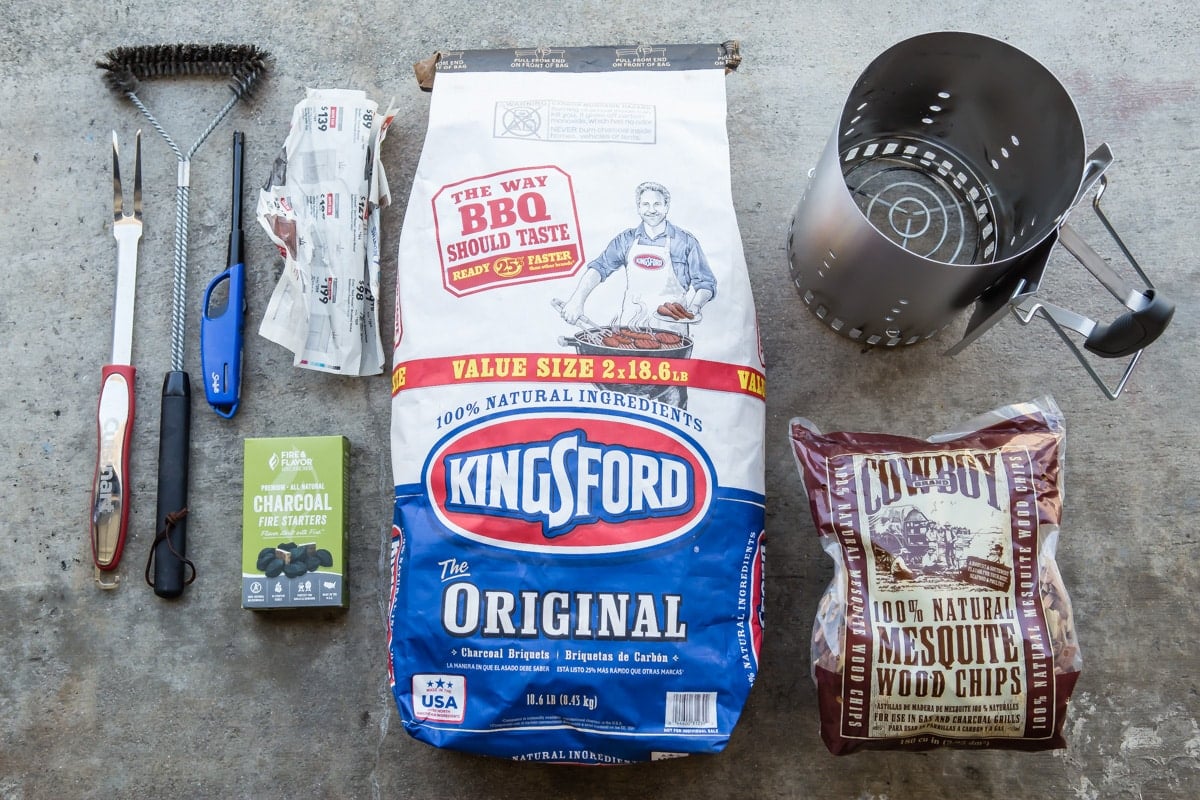
- Charcoal: Because fancy lump charcoal can burn too hot, a large bag of normal charcoal briquettes works best in a charcoal smoker for low and slow cooking. A 15-pound bag of Kingsford Original charcoal, or some other equivalent, should be enough for a day’s worth of smoking, at least 12-15 hours. Do not use fuel-impregnated briquettes.
- Paraffin cubes: These little cubes of clean-burning paraffin help the coals along and don’t introduce toxic chemicals or fumes into the food you’re cooking.
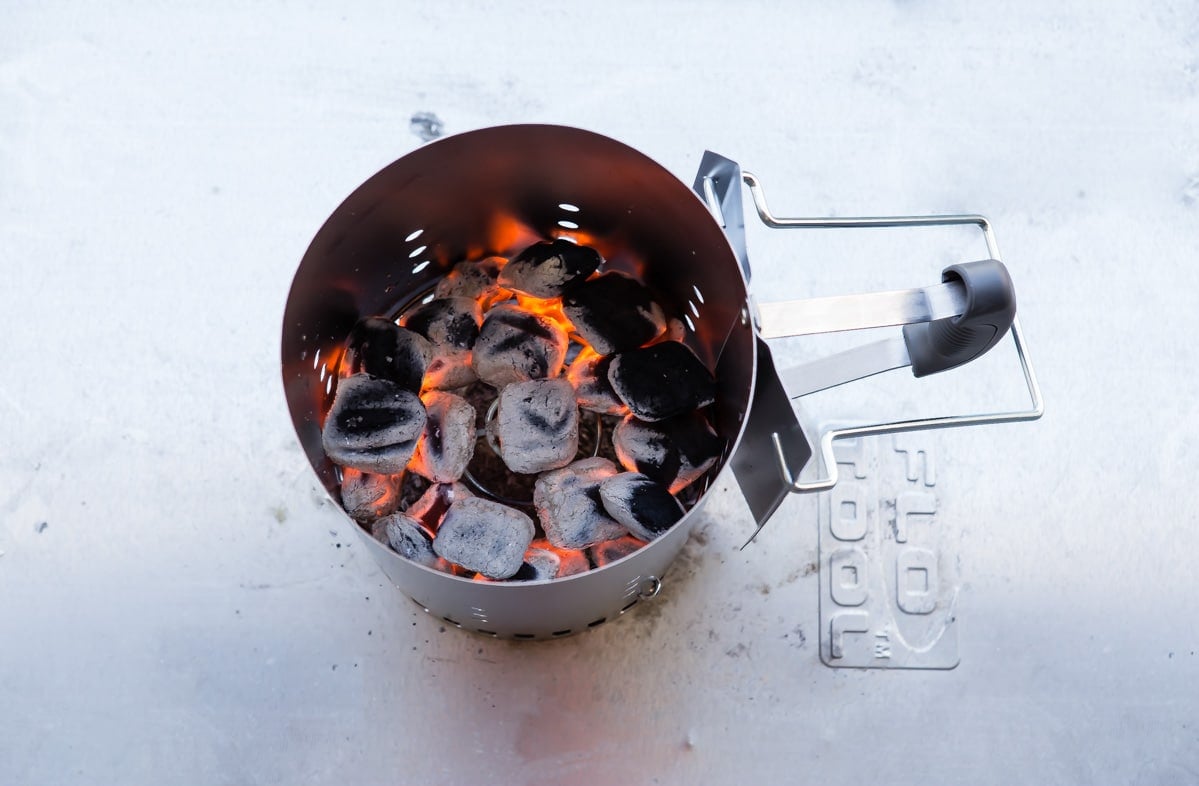
- Chimney starter: This crucial tool helps to safely and effectively light coals without chemicals.
- Long neck lighter: A clickable, omg neck lighter can be very helpful in lighting coals.
- Newspaper: A few sheets of newspaper are needed to light the coals in the charcoal chimney starter.
- Grill brush: A sturdy wire brush is perfect for loosening and removing debris on the cooking grates. Some prefer a lava stone.
- Aluminum foil: For wrapping meat at a certain point of the smoking process; also useful for cleaning dirty grates, when wadded up into a ball.
- Grill tongs: Long, fireproof tongs (plus any other tools you personally enjoy using) are helpful for placing and adjusting meat, as well as knocking grey ash off of coals to give them an extra boost.
- Fire poker: A fireplace tool that can poke the coals, if they cool down during smoking.
- Meat thermometer: A good quality meat thermometer is a sound investment for any newbie BBQ pitmaster.
- Hardwood chunks: Adding some untreated hardwood is optional but can be really delicious. See below for all the different kinds you can use, and what they’re good for.
What cuts of meat are best for smoking?
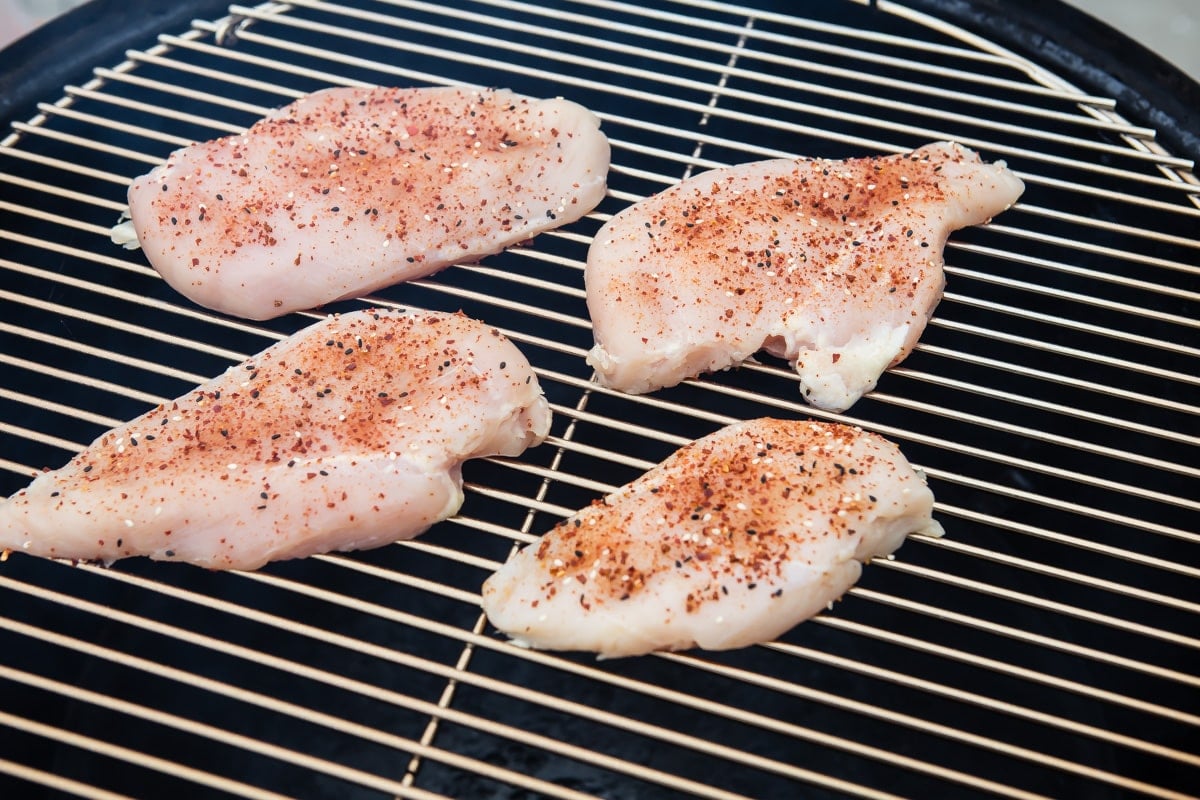
What type of meat to smoke is purely a matter of personal preference. The most popular meats are ribs, brisket, and pork shoulder (usually to make pulled pork). You can also smoke up a leg of lamb, lamb shoulder, sausages, turkey legs, whole turkey and chicken, chicken wings, and fish, If you keep the temperature very low, you can even smoke cheese, nuts, and olives.
Smoking was used for centuries as a way to preserve food to eat later, but in terms of barbecue, the process of smoking has grown around tough cuts of meat that usually don’t turn out well when cooked quickly, like brisket.
How to light a charcoal smoker
- Expose the charcoal grate. Remove the cylindrical part (center section) of the smoker, exposing the rounded bottom of the smoker, the lower charcoal grate, and the fire ring, also known as the coal chamber. Make sure these areas are relatively clean and free of ashes.
- Dump the briquettes. Generously pour the charcoal briquettes into the fire ring. Make a deep hole in the center of the briquettes with your hands. Distribute a couple of paraffin cubes inside the coals. This is called the Minion method.
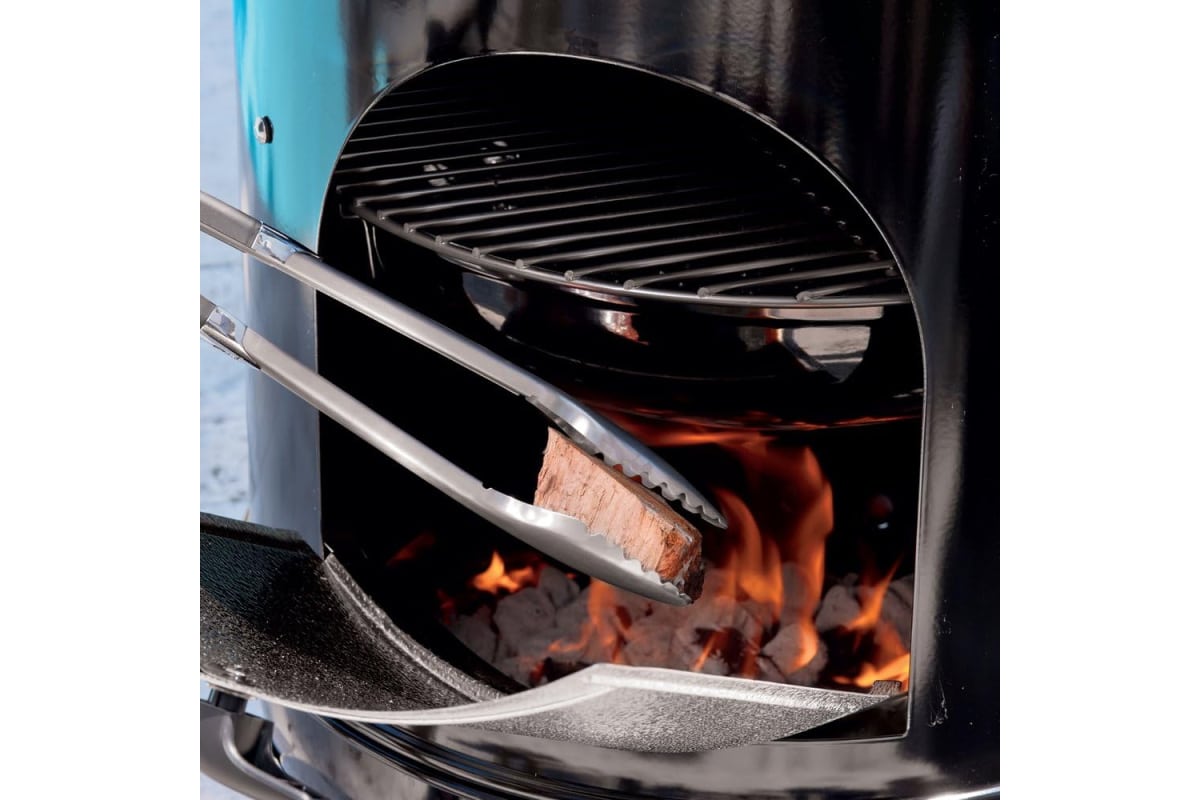
- Get the hardwood. If using hardwood chunks for extra flavor, throw a few medium to large dry chunks into the top of the coals in the lower grate, preferably near the vents, to create a bit more smoke. I like to wrap the hardwoods in foil to keep them separate. Only use three or four chunks, and don’t bury them deep into the coals—meat accepts the smoke flavor better when it’s raw and cool; once it starts cooking, the smoke can turn the meat bitter.
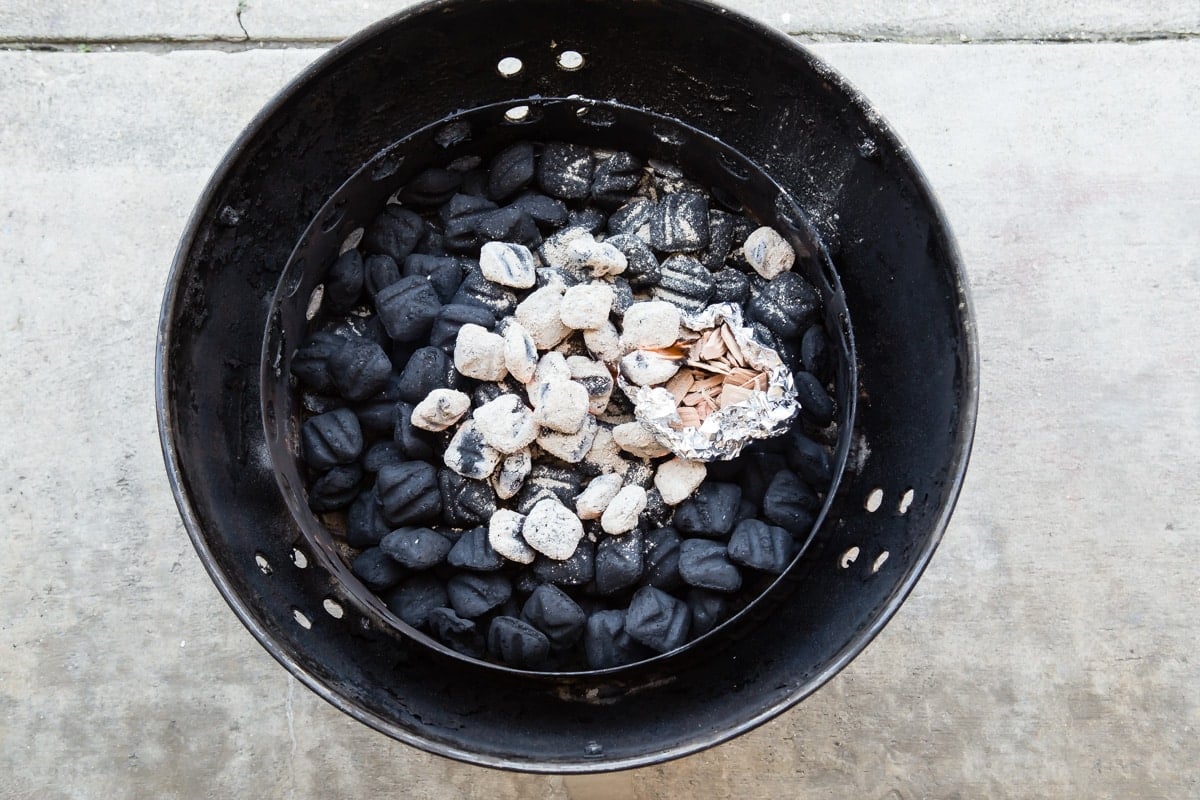
- Open the vents. For maximum air circulation, make sure the bottom vents are fully open, at least until the smoker reaches the desired temperature.
- Use a chimney starter. Fill the starter chamber of a chimney starter about halfway full with more briquettes. Stuff the bottom with paper according to the starter’s instructions and light. Once the briquettes in the starter are white in color and glowing orange inside, they’re ready. Pour them into the well you made in the center of the coal ring. Those lit coals will gradually light the surrounding coals; that’s what will sustain the long, slow cooking you need.
- Reassemble smoker. Return the cylinder part of the smoker to the bottom of the smoker.
- Fill the water pan. The water pan is a feature of some smokers that makes sure that whatever you’re smoking stays moist and tender. It doesn’t give the thick, hard crust that other smokers are known for, but the trade-off is succulent smoked meat, every single time. Open the smoker door and fill the pan about ¾ of the way up with water. You can add aromatics to the water: rosemary, oregano, bay leaves, even beer. Throughout smoking, it’s important to check the water levels in the water pan occasionally. When you check the coals using the door, keep an eye on the water pan and refill if needed.
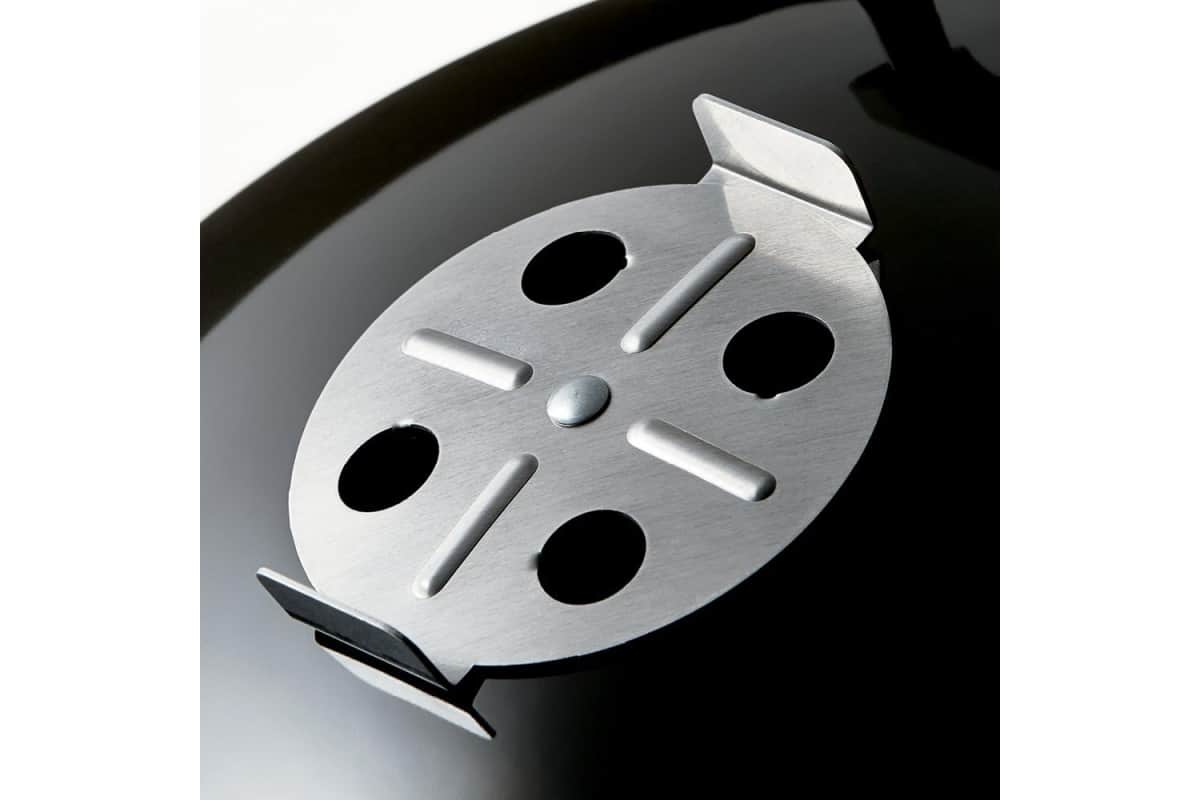
- Close it up. Close the door; double-check and make sure the vents are open. Place the lid on the smoker and keep the lid vent fully open. Chances are you’ll leave the lid vent open during the entire smoke.
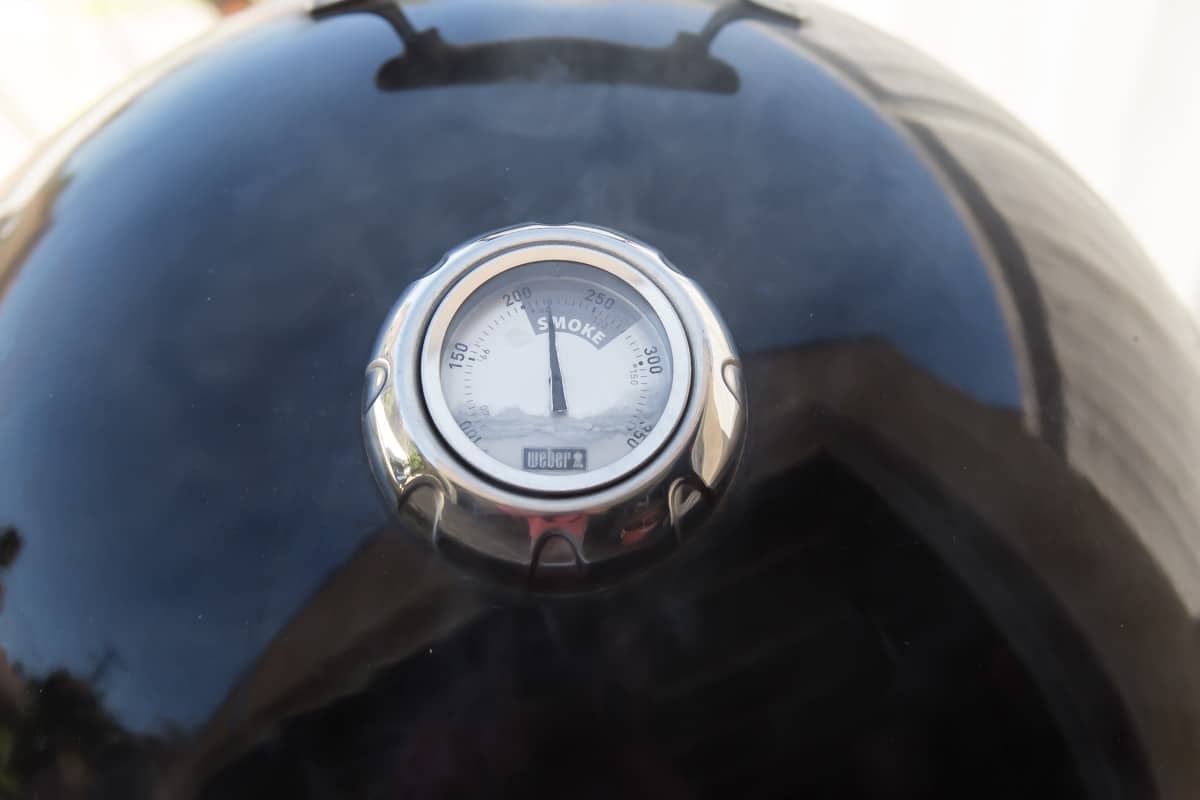
- Sit back and wait. Wait until the smoker comes up to temperature—about 225-250 degrees—which usually takes 30-45 minutes. This window is the optimum temperature, the sweet spot, for long smoking, but just in case, make sure to check with the recipe you’re using, to get the best results.
How to control charcoal smoker temperature, moderate heat, and get in the smoking zone
Once you get to the optimum cooking temperature, you’ll want to stay there. It’s important to have the temperature correct and also steady. A little extra time here makes things easier down the line and makes sure those ribs are as juicy as can be.
There are two big advantages to a low temperature: One is to give the smoke enough time to flavor the meat, and the other is to naturally tenderize the meat. Slow cooking gives the natural connective fibers in meat time to break down and become tender and irresistible.
Smokers require a bit of adjustment and a lot of patience to get the ideal temperature, depending on weather, your specific smoker, and even the coals you’re using. Every smoker should have a damper system (lower vents and upper vents) that allows for control of the heat inside the smoker without lifting the lid.
With the bottom and top vents open, air is sucked into the bottom of the smoker, through the coal and wood, drawn up around the food, and then forced out the top. That’s what the goal is, anyways!
If the smoker temperature is too hot:
You can use the lower three vents to moderate the temperature. Closing the lower vents cuts the oxygen supply and cools the smoker down; leaving them open allows more air to circulate and heat everything up.
If the temperature is running too hot (over 250 degrees) you can cool it down by partially closing the lower vents, so that no more than a pencil could fit through the holes. If the smoker is way too hot, you might close one of the lower vents completely. (Closing all the vents completely extinguishes the smoker.)
If the smoker temperature is too low:
If you’ve used enough briquettes at the beginning, most smoking projects should have enough heat to last for the whole cook. When you’re cooking something large like a whole ham or turkey, though, you might need to add coals or move the coals around to get them to burn hotter.
When the coals start to cool at the 10th or 11th hour, open the lower vents or stir up the briquettes with a fire poker to knock the ash off the coals.
For very long 18-24 hour cooks, knock the ash off of the coals to reawaken the coals. Then relight a chimney starter with new coals and add them to the coal chamber.
Unlike a gas stove, anything you do to change the temperature of the smoker takes time, so be prepared to wait 10 to 15 minutes after you change the vent settings to notice any effects.
How to add meat to the smoker
Once the smoker is up to the proper temperature and stabilized, it’s finally time to get cooking.
- Clean the grate with a brush or scraper to prepare the grates for the meat.
- If your smoker has upper and lower cooking grates, place any food to be smoked on the lower rack first. Position the upper grate on the top brackets and place any food to be smoked on the upper grate.
- Close the lid, and make a note of the time, writing it down if you have to. Every hour or so, check the temperature of the smoker, adjusting the vents as necessary, to maintain a 225-250 degree temperature.
- Always cook with the lid on the smoker, and resist the temptation to lift the lid during smoking. Don’t let that consistent temperature you worked so hard to achieve escape. You need a good, thick stream of smoke around the meat at all times to inhale the flavor. However, the smoke needs to be moving to prevent the smoke from turning the meat bitter, a result of creosote. So keep those vents open as much as you can!
The 3-2-1 Rule
When smoking, some pit masters will follow the “3-2-1 rule.” For the first 3 hours, the meat is left to smoke; then the meat is loosely wrapped in aluminum foil for the next 2 hours so the interior of the meat has a chance to cook properly. For the last hour or so of cooking, the foil is removed to allow the outside of the meat to develop a crisp exterior.
Most bbq aficionados strive for a pink ring (which is the nitric acid) around the meat just inside the dark outside layer.
Common cooking times for charcoal smoking
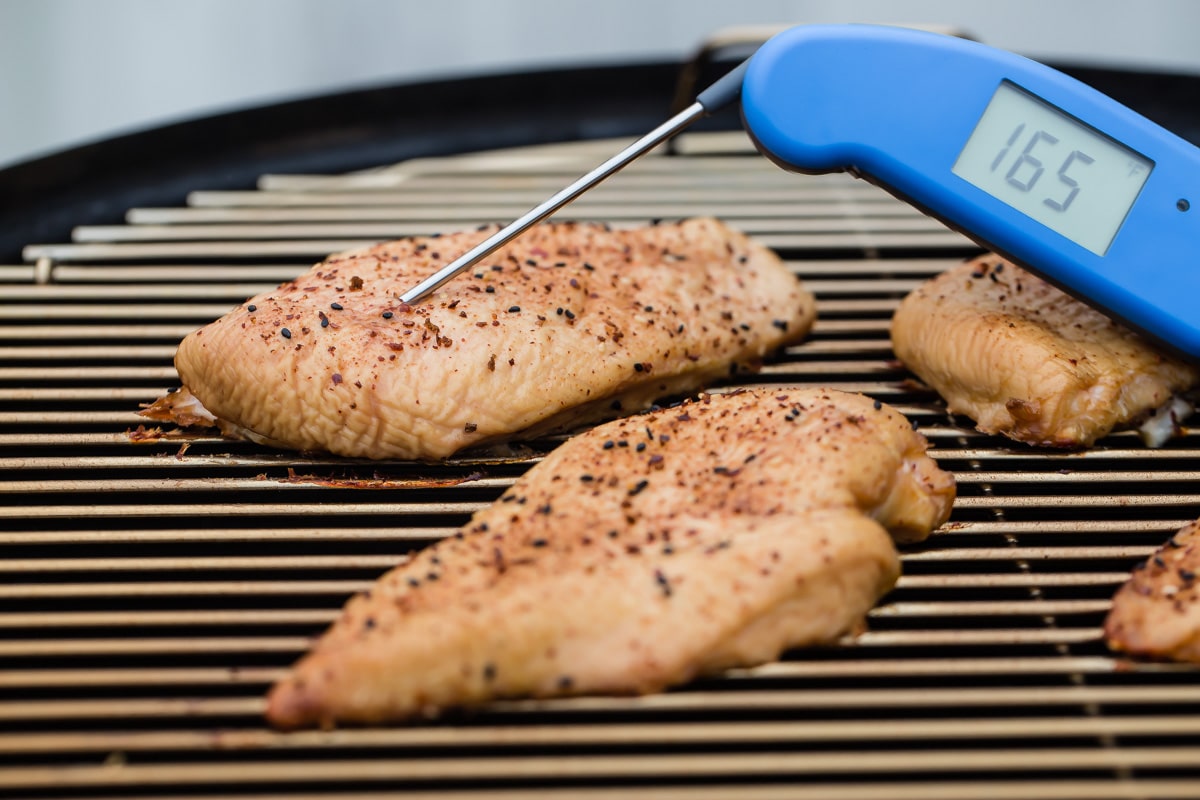
Below are some average times for charcoal smoking. Internal temperatures are taken with a digital meat thermometer, inserted inside the cut of meat. It can be difficult to give an accurate cook time estimate; the shape, thickness, and diameter of the meat can be as important as the weight of what you’re smoking. Bone-in meats may take longer.
On average, you will need 6 to 8 hours, but a large brisket can take up to 22 hours. This means minutes or hours per pounds calculations are always just an estimate.
- Chicken, whole, up to 5 lbs 2 ½ – 3 ½ hours, until its internal temperature measures 165 degrees
- Turkey, whole 8-12 lbs, 4-5 hours, 165 degrees
- Turkey, whole, 12-18 lbs, 8-10 hours, 165 degrees
- Duck, whole, 3-4 lbs, 2-2½ hours, 180 degrees
- Pork Roast, 4-8 lbs, 5-6 hours, 180 degrees
- Pork Ribs, 4-6 hours, until meat pulls from bone
- Ham, fresh, whole, 10-18 lbs, 8-12 hours, 170 degrees
- Pork shoulder for pulled pork, 4-8 lbs, 8-12 hours, 190 degrees
- Beef brisket, 5-6 lbs, 6-8 hours, 190 degrees
- Lamb or venison roast, 5-7 lbs, 5-6 hours, 160 degrees
- Game, large cuts, 7-9 lbs, 6-8 hours, 170 degrees
- Beef Ribs, 6-7 hours, 160 degrees
- Fish, whole, 8-10 lbs, 3-4 hours, 145 degrees
How to clean and maintain your smoker
Greasy grill grates and a ton of thick carbon buildup on the inside of the lid don’t do much to improve the flavor of smoked food. Too much grease and organic matter inside a smoker can invite mold and, at worst, start fires and ruin what you’ve invested in.
The best rule is that a clean grill is a good grill.
Before each smoke, a little light clean up to keep the grill performing well is in order. Scraping the cooking grates, wiping down the cool grill with a wet sponge, and disposing of ashes (only when the grill is completely cool) is about all you have to do.
Other than that, a once-a-year deep clean is recommended. Always defer to your specific smoker’s instruction manual, but here are some basics:
- Clean the cooking grates: Using a wire brush, a lava brick, or a ball of crumpled aluminum foil, scrape the grease and carbon off of the cooking grates.
- Clean the black scale build-up: That flaky, black charred stuff that is clinging for dear life to the lid of your smoker is called scale. It’s a buildup of carbon, soot, creosote, and other by-products. This can fall down into your food, so when it starts to curl scrape it off using a putty knife or a stiff wire brush and use a shop vacuum to suck it up and away. Any smoker with digital controls or a fan should be kept dry, as water could interfere with the circuitry or rust moving parts.
- Change grease collector: Different manufacturers have different set-ups for controlling grease buildup inside smokers. You may find that dripping pans, grease collectors, or even lining the inside of the smoker with sheets of aluminum foil be the easiest way to combat serious accumulation.
- Wipe off the thermometer probe. Built-in thermometers should have the probe wiped clean. Be careful not to get water into the dial area; this could interfere with accurate temperatures. The exterior can be wiped down with a damp sponge and a mild soapy solution.
Types of hardwood
Adding different hardwoods to the smoker has a direct effect on the food’s taste. It may take some experimenting to get the combination of hardwood and meat that you love the best, but it sure will be fun trying to figure it out.
Here are some basic hardwood characteristics and what they’re often used with. Remember, less is more, so don’t overdo it with wood. 2-4 chucks should be enough for almost any smoking session.
Some charcoal smokers require you to presoak the wood to give off steam during smoking. If the smoker you’re using has a water pan, there’s no need to presoak the wood chunks beforehand. There’s enough steam from the water.
Large chunks of wood can be placed directly within the coals. If you have a bag of wood chips that you’d like to experiment with, make a packet out of aluminum foil and add them, along with some water, to the pouch. Make a couple of punctures in the top of the foil and throw it in the smoker.
Never use soft, resinous wood like pine, cedar, or aspen wood for smoking.
- Apple: Fruity smoke flavor, perfect for beef, pork, and ham.
- Alder: a delicate smoking wood, alder is fantastic with all fish.
- Cherry: Mild and fruity, goes well with hickory wood. Delicious with ham, chicken, and turkey.
- Hickory: Sweet, savory, and hearty, hickory adds a bacon flavor to the food. Don’t overdo it, though—a little goes a long way. Perfect for all meat and poultry, but especially ribs and pork shoulders.
- Maple: A subtle smoking wood with mild smokiness. Best for game, pork, vegetables, and poultry.
- Mesquite: An intensely flavored wood with a unique flavor. Best for red meat of all kinds.
- Oak: a basic wood with a medium-strong flavor that doesn’t overpower. Perfect for lamb, brisket, and sausages.
- Pecan: A nutty wood with a sweet flavor. Used for briskets, roasts, and ribs.
Great recipes for your charcoal smoker
Appetizer Recipes
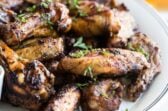
Smoked Chicken Wings
Grilling and Smoker Recipes
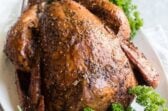
Smoked Turkey
Grilling and Smoker Recipes
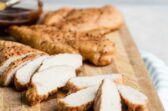
Smoked Chicken Breast

Grilling and Smoker Recipes
Smoked Salmon
Grilling and Smoker Recipes
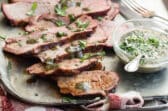
Smoked Tri-Tip
Grilling and Smoker Recipes
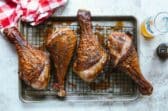
Smoked Turkey Legs
Meggan Hill is a classically-trained chef and professional writer. Her meticulously-tested recipes and detailed tutorials bring confidence and success to home cooks everywhere. Meggan has been featured on NPR, HuffPost, FoxNews, LA Times, and more.