How to Roast Peppers and Chilies
Learn how to roast peppers and chilies in the oven or on a gas burner. Use this method for bell peppers, poblanos, serranos, jalapeños, and more!
Servings 4 servings
Calories 35kcal
Instructions
To roast peppers over an open flame:
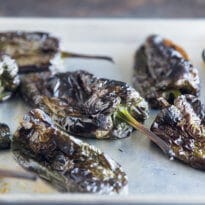
- Turn the flame of a gas stove to HIGH. Using tongs, place chilies directly in or over the flame until the skin is charred and blistered but not ash white, turning occasionally, about 2 to 3 minutes. Or, roast over a very charcoal or gas grill for 3 to 5 minutes.
- Transfer to a bowl and cover tightly with plastic wrap. Let stand until the skin starts to loosen and the peppers are cool enough to handle, about 10 minutes.
- Wearing gloves or using a clean kitchen towel, carefully rub off and discard the blackened skin. Leave the stem and seeds intact if desired for your recipe; otherwise, remove and discard them.
To roast the peppers under the oven broiler:
- Arrange an oven rack as close to the broiler element as possible and preheat on HIGH. Line a baking sheet with aluminum foil for easy cleanup. Arrange peppers in a single layer on prepared baking sheet.
- Broil the peppers until the skin is charred and blistered but not ash white, turning often, about 5 to 10 minutes.
- Transfer to a bowl and cover tightly with plastic wrap. Let stand until the skin starts to loosen and the peppers are cool enough to handle, about 10 minutes.
- Wearing gloves or using a clean kitchen towel, carefully rub off and discard the blackened skin. Leave the stem and seeds intact if desired for your recipe; otherwise, remove and discard them.
To roast the peppers in the oven:
- Preheat oven to 400 degrees. Line a baking sheet with aluminum foil for easy cleanup. Arrange peppers in a single layer on prepared baking sheet.
- Broil the peppers until the skin is charred and blistered but not ash white, turning occasionally, about 30 to 40 minutes.
- Transfer to a bowl and cover tightly with plastic wrap. Let stand until the skin starts to loosen and the peppers are cool enough to handle, about 10 minutes.
- Wearing gloves or using a clean kitchen towel, carefully rub off and discard the blackened skin. Leave the stem and seeds intact if desired for your recipe; otherwise, remove and discard them.
To seed the peppers for stuffing:
- Using a small knife, slit each pepper lengthwise from the stem to the bottom, leaving the top 1/2-inch and the bottom 1/2-inch uncut. Leaving the stem intact, remove seeds and membranes. Wipe inside of pepper with a damp towel and dry well.
To slice or chop the peppers:
- Slit each pepper lengthwise and lay flat. Cut out stem, remove seeds and membranes, and slice or chop as desired.
Video
Notes
- Peppers vs. chiles: They are the same thing; it’s really just a matter of naming conventions. “Chile” is the Spanish word for capsicums such as jalapeños, serranos, habañeros, poblanos, and so on. Americans sometimes spell it “chili” but now we are moving towards “chile” because “chili” is the stew with the meat. We sometimes say “pepper” in the United States because when Columbus arrived, he thought chiles were “peppers” (as in spicy black pepper, a member of the Piper genus). He was wrong. We always use the word “pepper” for non-spicy peppers such as bell peppers.
- Steaming: Wrapping in plastic wrap (or a plastic baggie also works!) is a crucial step. It makes the pepper's papery, tough outer skin loosen and separate from the rest of the vegetable. And that makes it easier to remove! If the skin doesn't fall off easily, grab a clean kitchen towel or some dry paper towels and rub with those.
- Gloves: I definitely recommend wearing gloves for this process because some peppers are spicy no matter what. I always seem to have an itch near my eye when I handle peppers without gloves, and I've paid the price more than once.
- Seeds: Once the peppers are finished, you can leave them as-is, or seed them. Read your recipe to see what it calls for. Depending on what you're cooking, keep them whole for stuffed peppers, or stem, seed, and chop and add them to soups, salads, sandwiches, and the most phenomenal salsa ever!
- Aim for blackened peppers, not ash: Try not to roast the peppers so long that they begin to shoulder into ash. The stem may burn like a match, and that's okay, but you want to preserve the sweet flesh of the pepper under that blistered skin.
- Cooking times may vary: Watch the peppers closely as they roast. Differently sized peppers will need more or less cooking time than what is specified in this how-to. You'll get the hang of it!
- Storage: You can keep the peppers stored, covered, in the refrigerator for up to a week. Or, store them in the freezer for up to one year. Canned roasted peppers? Even longer.
- DIY diced green chilies. Roasted, peeled, and diced jalapeño peppers can be used in any recipe calling for a can of "diced green chiles." So keep that in mind!
Nutrition
Calories: 35kcal | Carbohydrates: 7g | Protein: 1g | Fat: 1g | Saturated Fat: 1g | Sodium: 5mg | Potassium: 239mg | Fiber: 2g | Sugar: 5g | Vitamin A: 3550IU | Vitamin C: 145mg | Calcium: 8mg | Iron: 1mg