This post may contain affiliate links. For more information, please see our affiliate policy.
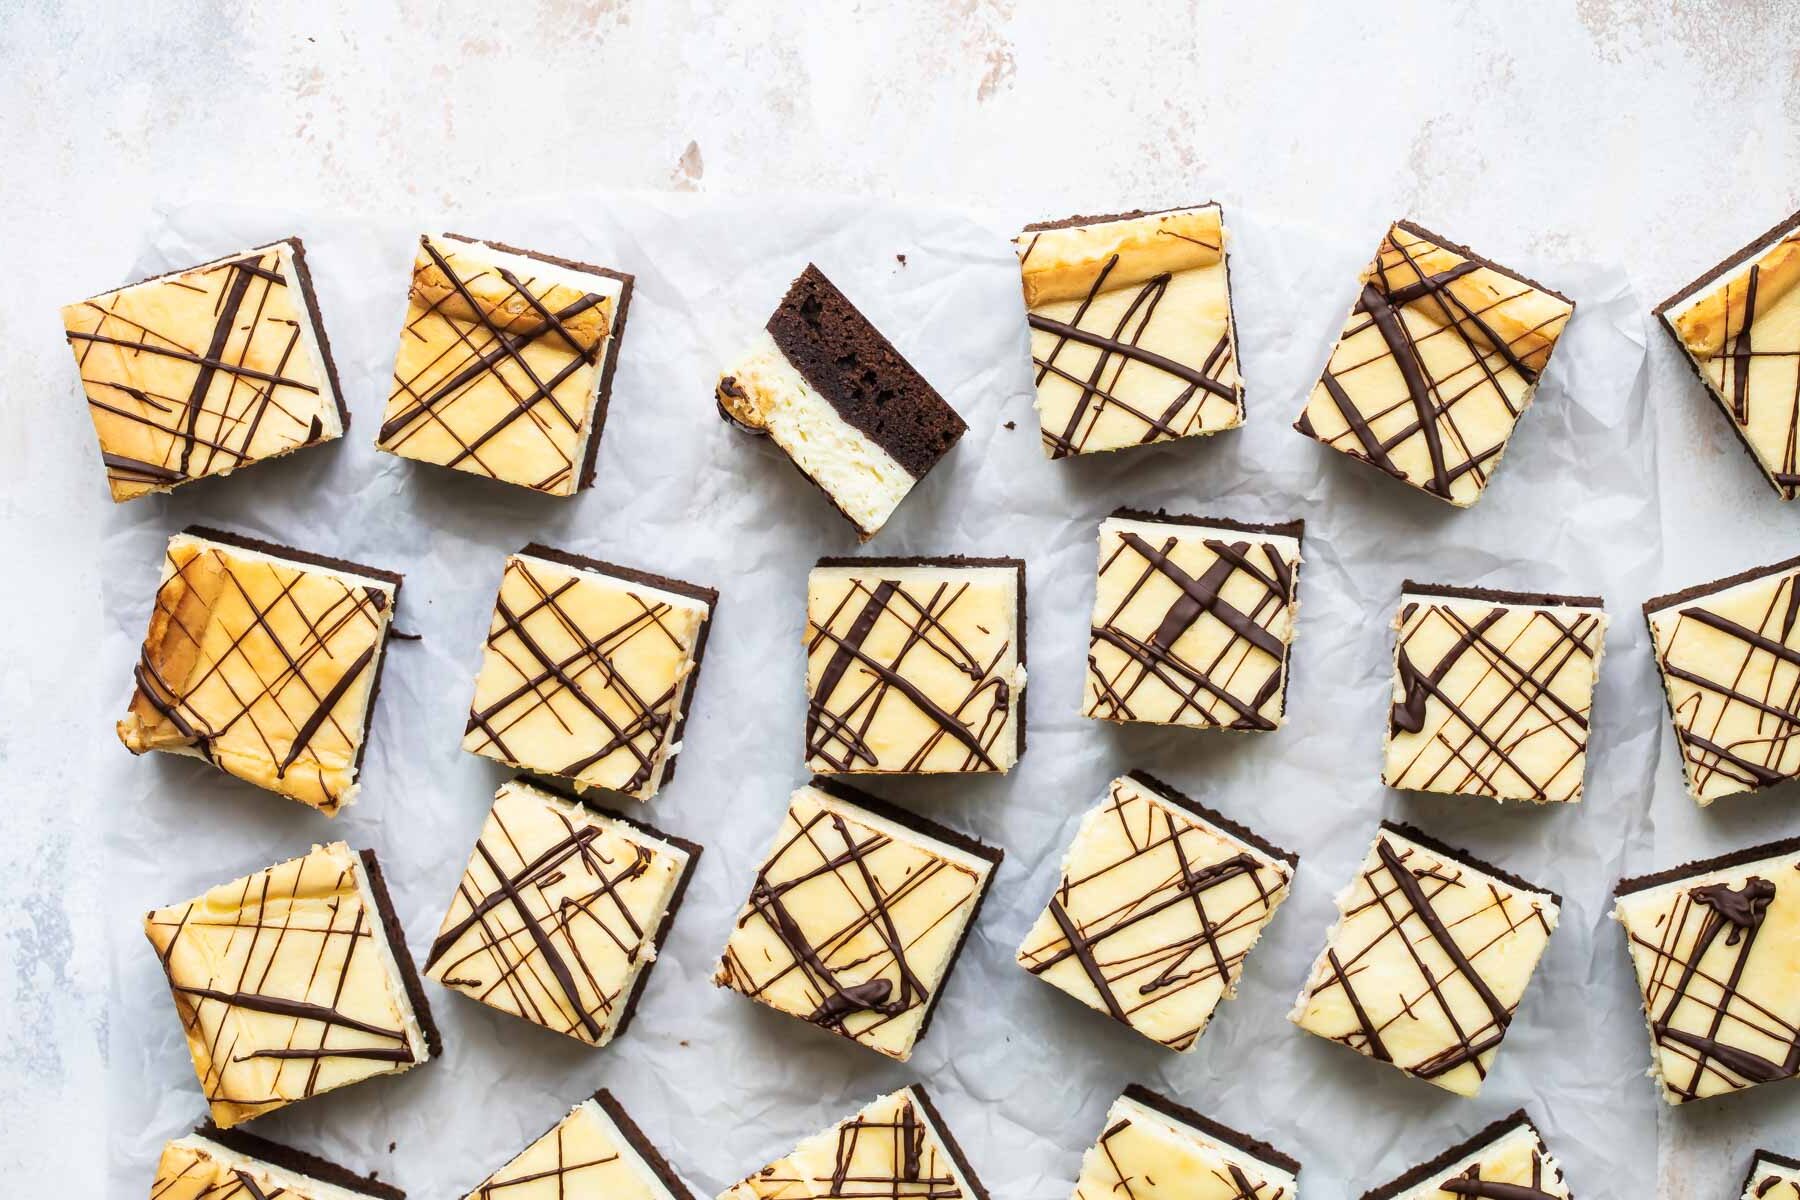
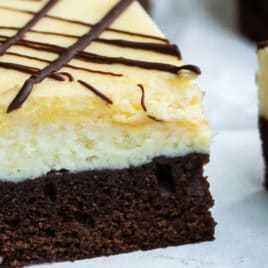
Half fudgy brownie, half creamy cheesecake, these Cheesecake Brownies are among the most decadent dessert recipes I’ve ever developed. To get these out of the table and onto your plate as fast as possible, this recipe starts with a boxed brownie mix.
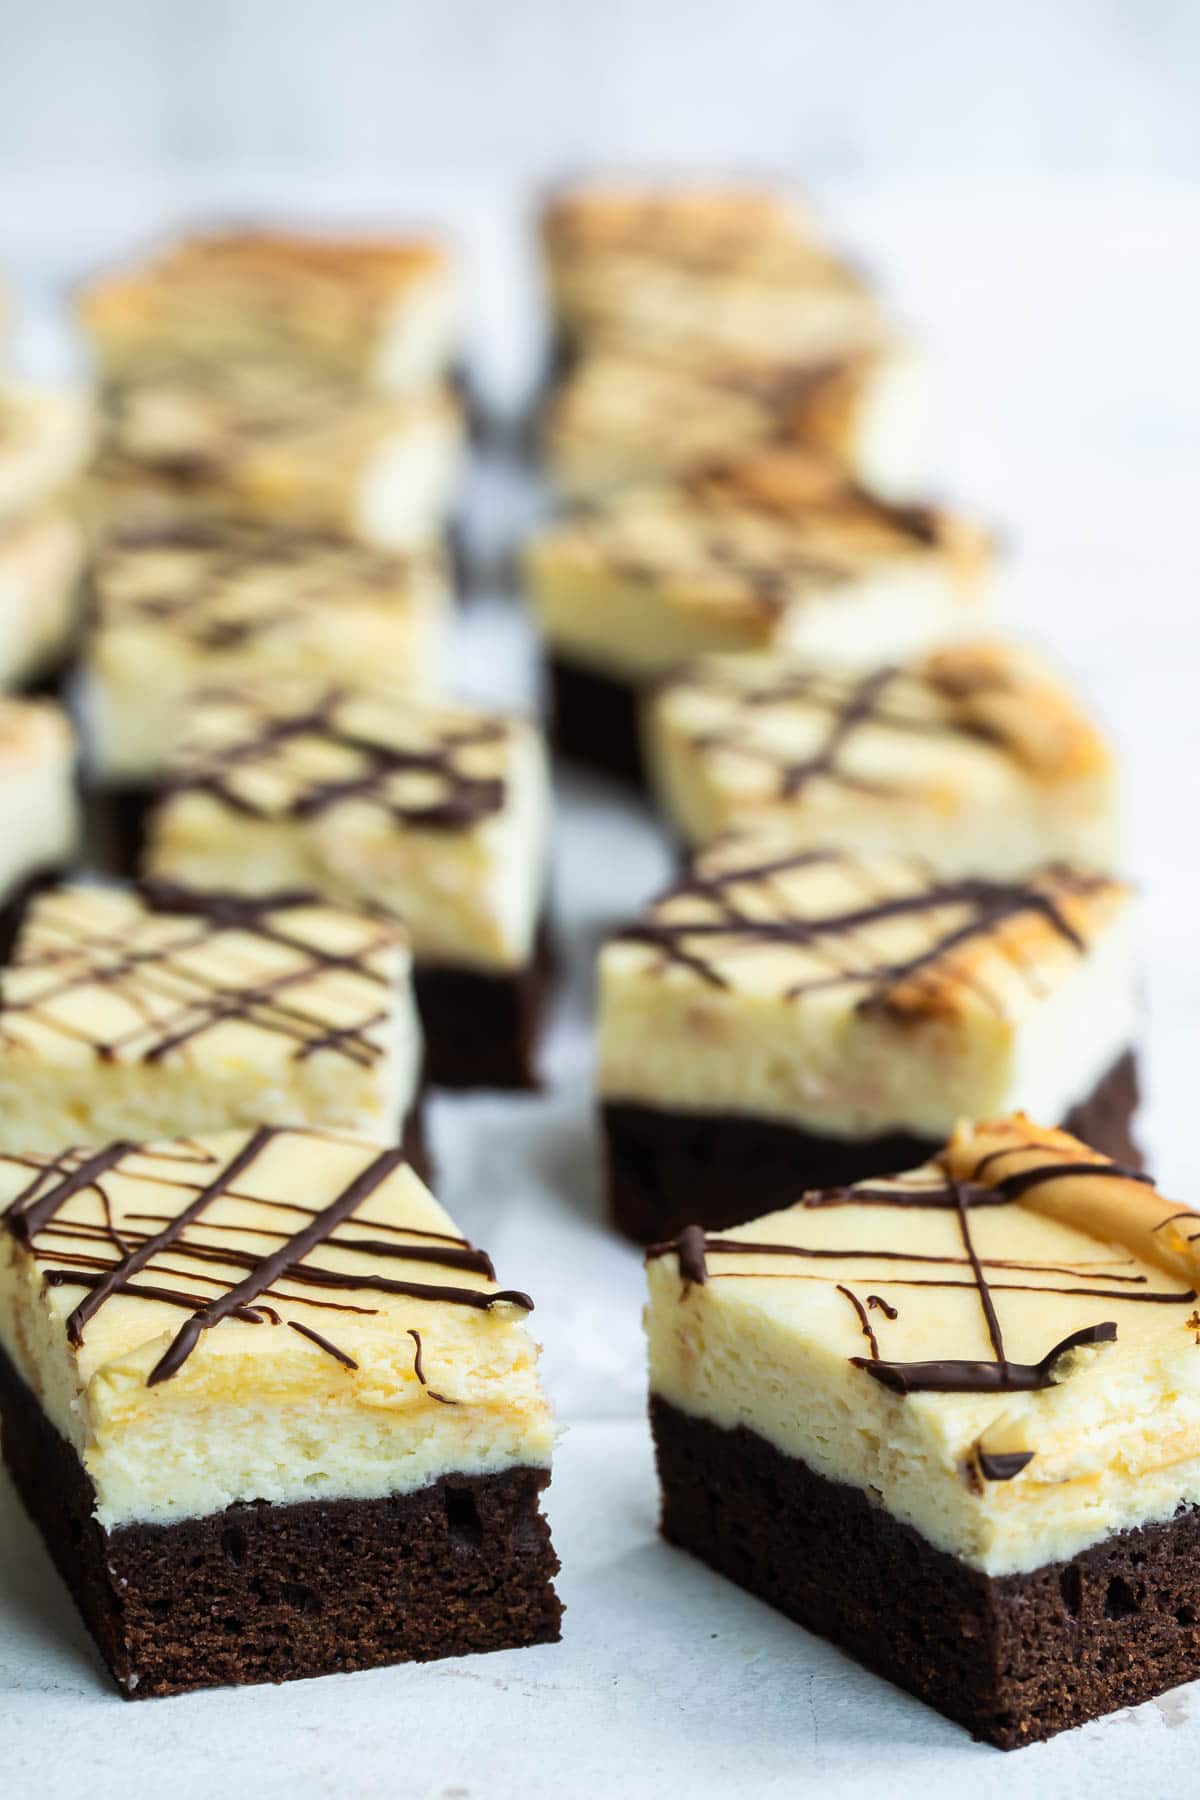
There’s something about putting rich, chocolatey brownies together with soft, tangy cheesecake that just works. The brownie layer is dark and chewy while the cheesecake layer is light and creamy, both holding their own in contrast to the other.
4 blocks of cream cheese might soundl like a lot, but that’s the same amount that goes in to a standard Vanilla Cheesecake. And keep in mind, you’re using a 9-inch by 13-inch baking dish here, so it’s not a small batch. It’s a big pan with big chocolate flavor and cheesecake batter all wrapped up in one, and it’s worth every bite.
Table of Contents
Recipe ingredients
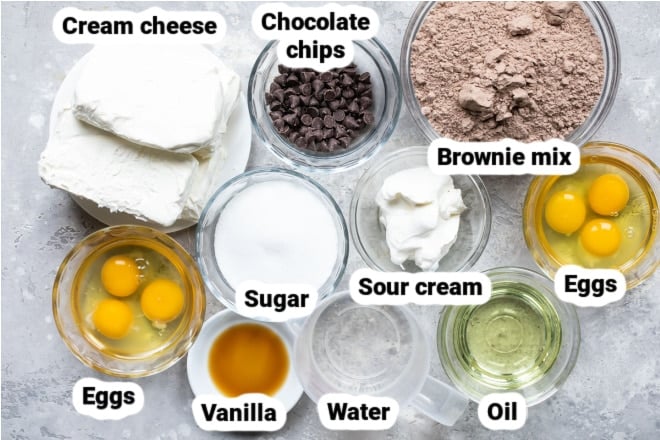
At a Glance: Here is a quick snapshot of what ingredients are in this recipe.
Please see the recipe card below for specific quantities.
Ingredient notes
- Brownie mix: Take note of the package instructions and round up all of the ingredients (such as oil, eggs, or water) you’ll need to prepare them according to the manufacturer’s recipe. You can also make brownies from scratch if you prefer (the recipe is made with cocoa powder, espresso, unsweetened chocolate, bitterwsweet chocolate, and both butter and oil).
- Sour cream: This adds the signature cheesecake tang to the top layer.
- Chocolate chips: Choose semi-sweet chocolate chips, milk chocolate chips, or dark chocolate based on what you have handy or prefer.
Step-by-step instructions
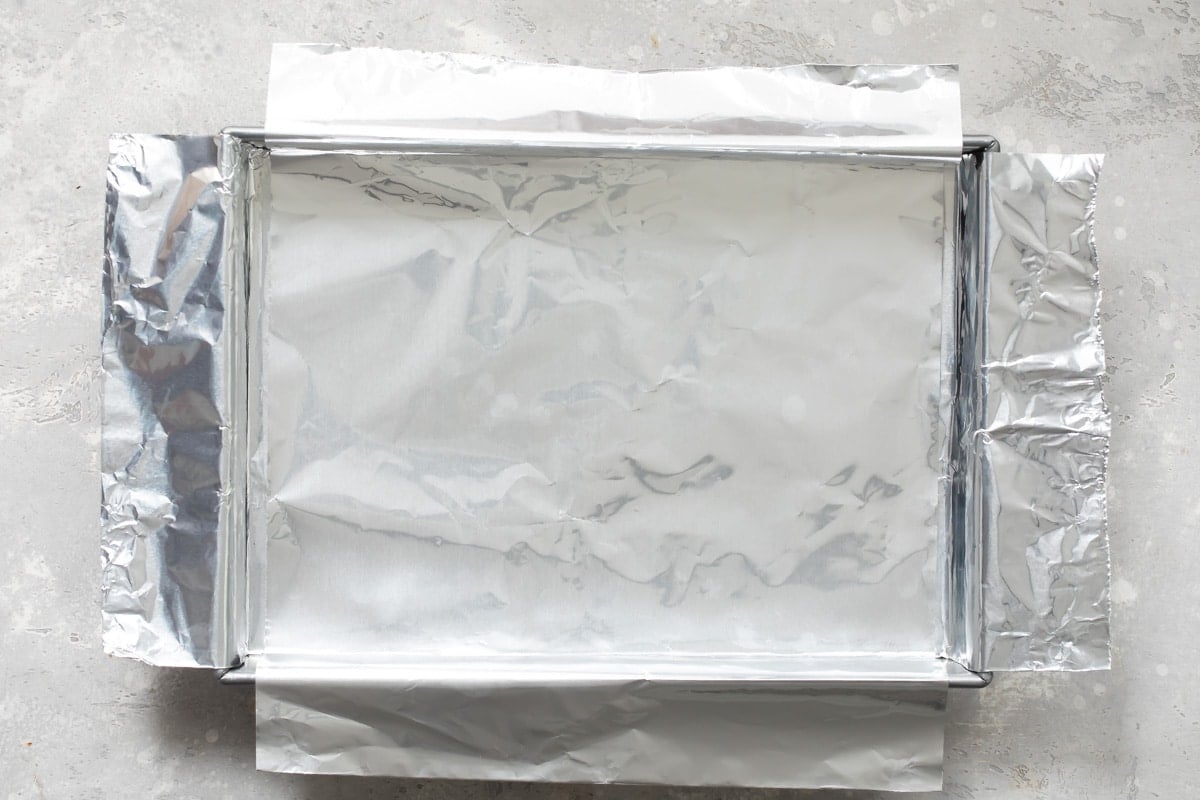
- Adjust the oven rack to the lowest position and preheat the oven to 350 degrees. Make an aluminum foil sling for a 9-inch by 13-inch baking pan. The first sheet should be 13 inches wide and the second sheet should be 9 inches wide. Lay sheets of foil in the pan perpendicular to each other with extra foil hanging over the edges of the pan. Push foil into corners and up the sides of the pan, smooth foil flush to pan. Coat the foil with nonstick spray.
- Whisk together the brownie batter according to the package directions (or in a large bowl with an electric mixer) and pour into the prepared pan, stirring the last few strokes by hand to ensure all the mix is off the bottom of the bowl. Bake until top of brownie is shiny and center is almost set, about 15 minutes.

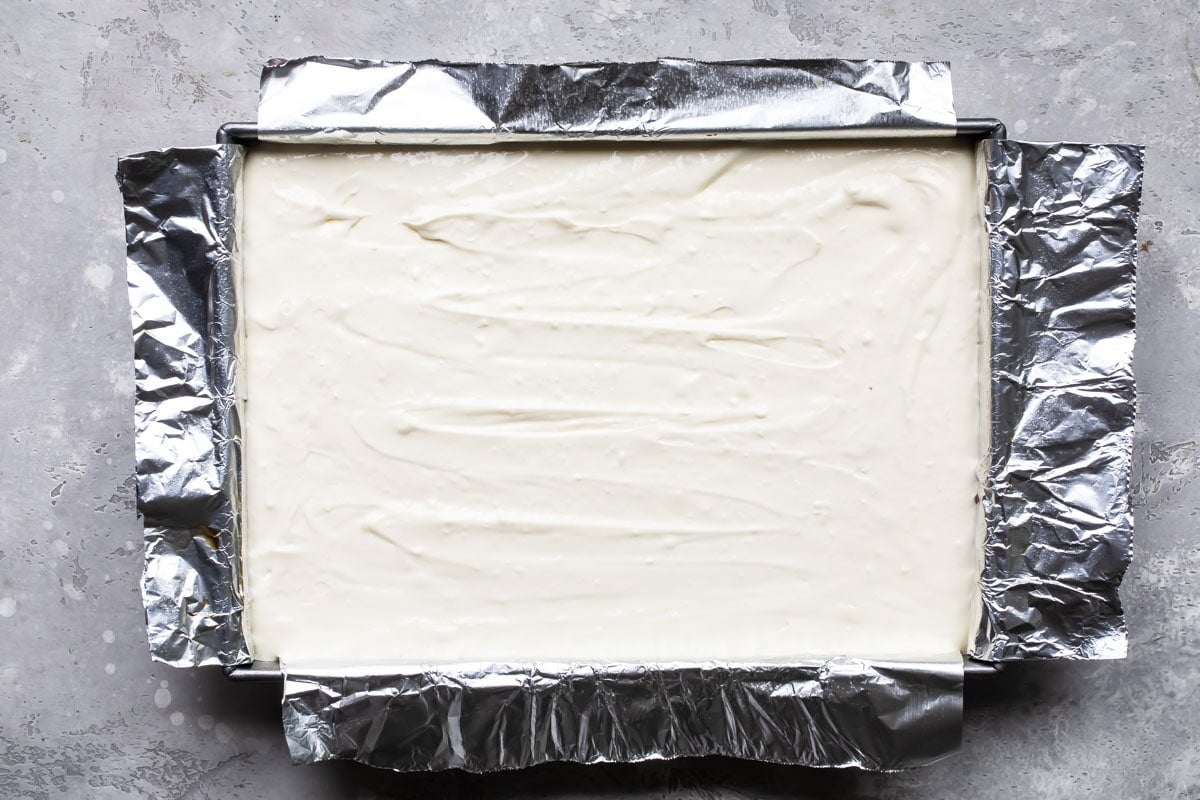
- Meanwhile, in a stand mixer fitted with the paddle attachment, beat the cream cheese, sugar and vanilla on medium speed until combined. Beat in sour cream. Add the eggs, one at a time, mixing on low speed until blended. Pour the mixture over the partially baked brownie, filling the mixture to almost the top of the pan. Bake until center is almost set, about 40 minutes.
- Remove from oven and run a knife or metal spatula around the rim of the baking dish to loosen the brownies. Cool, then refrigerate 4 hours or overnight. Allow the Cheesecake Brownies to stand 30 minutes at room temperature prior to serving. Remove from the pan using the foil as a handle. Melt the chocolate chips in the microwave in 30-second increments at 50% power until melted. Drizzle over the bars and let stand until chocolate is firm.
Recipe tips and variations
- Yield: This recipe makes 24 bars (you can cut them bigger, but they are rich). Slice the 9-inch by 13-inch pan into 6 rows one direction and 4 rows the other direction.
- Storage: Store leftovers in the refrigerator for up to 4 days.
- Make ahead: Bake and chill the Cheesecake Brownies up to 1 day in advance.
- Freezer: You can safely freeze Cheesecake Brownies; just know, they might suffer in quality a little bit when they thaw. I find it best to cut them first, individually quick-freeze, wrap in double layers of plastic wrap, and pack into freezer-safe containers. Label, date, and freeze up to 2 months. Thaw overnight in the refrigerator.
- Foil sling: You can also line your baking pan with criss-crossed parchment paper.
- Topping: Skip the chocolate drizzle if you don’t want to (or don’t have time for) that quick extra step. Or, reserve some brownie crumbs to sprinkle over the top.
- Marble swirl topping: Add small dollops of fruit jam to the cheesecake topping prior to baking for the second round, then use a knife or skewer to gently draw alternating lines through the cream to create a marbled look.
Frequently Asked Questions
Natural cocoa powder is simple ground chocolate powder that is unsweetened. It is naturally acidic and when combined with baking soda (an alkaline ingredient), will cause a leavening reaction.
Dutch-processed cocoa powder has been treated with an alkalizing agent to make it les acidic, so it won’t create a leavening reaction when combined with just baking soda. It’s there for the flavor. Therefore, recipes with Dutch-processed cocoa powder usually call for baking powder which can react and leaven baked goods on its own (it’s both acidic and alkaline).
The trick to a chewy brownie is to keep the saturated fat (butter) low but to raise the unsaturated fat (oil, eggs). In my homemade brownie recipe, we still want a little butter for flavor, but oil in the brownie batter is a one-way ticket to Chewy Town.
More chocolate treats
Pie and Tart Recipes
Chocolate Cream Pie
Cake Recipes
Easy Chocolate Eclair Cake
Chocolate Recipes
Easy Chocolate Mousse Recipe

Cake Recipes
Chocolate Lasagna
Join Us
Cheesecake Brownies
Ingredients
- 1 package brownie mix plus the eggs, oil, and water needed to make them (see note 1)
- 4 (8 ounce) packages cream cheese softened
- 1 cup granulated sugar
- 1 tsp vanilla extract
- 1/2 cup sour cream (see note 2)
- 3 eggs
- 2 ounces chocolate chips (about ⅓ cup, see note 3)
Instructions
- Adjust the oven rack to the lowest position and preheat oven to 350 degrees. Make a foil sling for a 9-inch by 13-inch baking pan. The first sheet should be 13 inches wide and the second sheets should be 9 inches wide. Lay sheets of foil in pan perpendicular to each other with extra foil hanging over the edges of the pan. Push foil into corners and up the sides of the pan, smooth foil flush to pan. Coat foil with nonstick spray.
- Prepare the brownie mix according to the package directions and pour into the prepared pan. Bake until top of brownie is shiny and center is almost set, about 15 minutes.
- Meanwhile, in a standing mixer fitted with the paddle attachment, beat the cream cheese, sugar and vanilla on medium speed until combined. Beat in sour cream. Add the eggs, one at a time, mixing on low speed until blended. Pour the mixture over the partially baked brownie, filling the mixture to almost the top of the pan.
- Bake until center is almost set, about 40 minutes. Remove from oven and run a knife or metal spatula around the rim of the baking dish to loosen cake. Cool and then refrigerate 4 hours or overnight. Allow to stand 30 minutes at room temperature prior to serving. Remove from the pan using the foil as a handle.
- Melt the chocolate chips in the microwave in 30-second increments at 50% power until melted. Drizzle over the bars and let stand until chocolate is firm.
Notes
- Brownie mix: Take note of the package instructions and round up all of the ingredients (such as oil, eggs, or water) you’ll need to prepare them according to the manufacturer’s recipe. You can also make brownies from scratch if you prefer.
- Sour cream: This adds the signature cheesecake tang to the top layer.
- Chocolate chips: Choose semi-sweet, milk, or dark based on what you have handy or prefer.
- Yield: This recipe makes 24 bars (you can cut them bigger, but they are rich). Slice the 9-inch by 13-inch pan into 6 rows one direction and 4 rows the other direction.
- Storage: Store leftovers in the refrigerator for up to 4 days.
Nutrition
Meggan Hill is a classically-trained chef and professional writer. Her meticulously-tested recipes and detailed tutorials bring confidence and success to home cooks everywhere. Meggan has been featured on NPR, HuffPost, FoxNews, LA Times, and more.
I’m confused on how to do the foil and what the purpose is
Hi April, the foil sling is two pieces of foil laid across each other in a pan to help get baked goods out of the baking pan without sticking to the sides, like brownies and bars. In the middle of the post under step 1 is a photo of what it should look like. Please let me know if you have any more questions, happy to help! Take care! – Meggan
Can I use a 8×8 pan? How long would the brownies need to cook for before I add the cheesecake topping?
Hi Krissy, you may need to divide the recipe by 1/2 to make it in an 8×8 pan, or split the full recipe between two 8×8-inch pans. I haven’t tested this myself, but a 9×13 inch pan has a volume of 14 cups, and an 8×8-inch pan has a volume of about 8 cups, so I’m thinking it will overflow. The brownie layer takes about 15 minutes to become shiny and set in the 9×13-inch pan, it may vary if you use the smaller pan. Thanks for the questions, I hope this helps! – Meggan
I made with just 2 packs of cream cheese and it came out just as good!
Does this recipe really need 4 pkgs of cream cheese?
I used 4 packages. Per the author’s description: “I feel like I should warn you: the cheesecake filling has 4 boxes of cream cheese in it.” Of course, anyone can alter any recipe to their individual preference/requirements. I prefer a lot of cheesecake with my brownie, as does everyone who tried this recipe.
I’d like to give your comment 5 stars, Janeen. Thank you!!! 😀 -Meggan
Just brought these for a Valentines Day office gathering this morning. They got rave reviews, and I was asked to bring them again for the next pot luck. I will DEFINITELY make these again! I love that they have a good amount of cheesecake filling on top. So many other recipes I’ve tried, the cheesecake doesn’t come through, because there’s not enough of it, but not so with this excellent recipe. I used a glass pan and they ended up a bit overbaked in the corners. I would try my Air Bake pan next time and stick to the recommended time (my oven tends to run a smidge cooler, so I usually increase time on most recipes, but shouldn’t have on this one. Instead of the Chocolate drizzle on top, I dolloped some semi-melted strawberry fruit spread in regular intervals on top, then dragged a butter knive lightly through the red dollops to try and emulate a heart shape. The design wasn’t perfect, but still gave it that Valentine’s Day flair I was after.
A match made in heaven! To greats that play well together